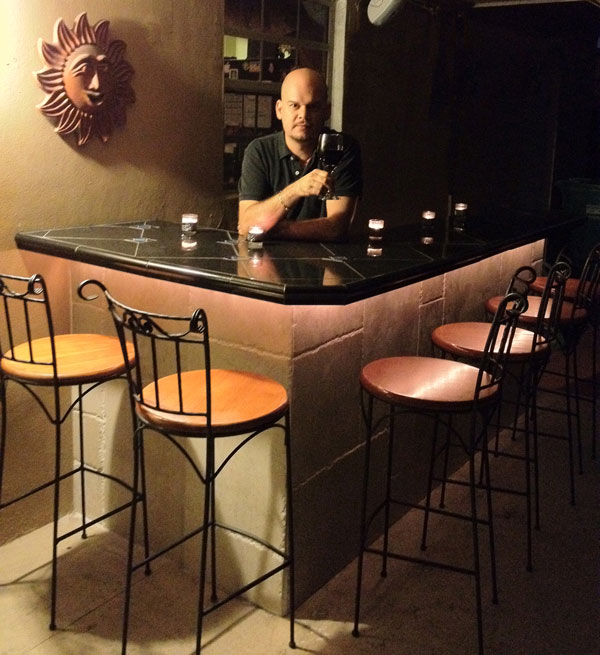
My first bar sign.
What a cool Christmas present!
Thank you, Maye!!!
December 27, 2011 by Felix
Category Post construction | Tags: bar,Christmas,gift,Maye,sign | Comments Off on Thank you, Maye!
November 14, 2011 by Felix
STOOLS ARE EXPENSIVE!!!
I learned this fact once I was ready to start looking for 6 new stools. They definitely had to have backs and the swiveling type would be nice but not necessary.
After checking all over the Internet, from Target to Carl’s, Ikea to Lowe’s, I was pretty discouraged at the thought of spending more for 6 stools than the total for all the materials of the entire bar!
Then fate struck… I found FOUR beautiful, wrought iron and wood bar stools for only $50 total on Craigslist!! This was a case of sounding too good to be true and actually being true!
If that wasn’t awesome enough, a few days later, I found two more of the exact style, also on Craigslist, for $60 for both!
$110 divided by 6 = $18.33 per stool!
Grand total – Phase I: $915

Category Construction | Tags: bar,bar stools,finished,phase I,stools | 5 Comments
October 18, 2011 by Felix
Category Construction | Tags: atmosphere,bar,lights,mood | Comments Off on Day 15 – Let there be light!
October 17, 2011 by Felix
Followed the instructions on the grout box and all went smoothly. Wish I had another sponge or two. Found myself rinsing the one I had every 2 minutes.
Running total: $771
Category Construction | Tags: bar,granite,grout,tile,top | Comments Off on Day 14 – Top grouted… End in sight!
October 16, 2011 by Felix
Yup, cheap bathroom tile! Spent $13.58 on black ceramic tile for the inside of the bar as opposed to the $105 it would’ve cost to use the same trim as on the outside. Stuck those suckers on with mastic and because they were nice and light, I didn’t have to use clamps or anything.
Once this dries, I’m ready to grout the top!
Running total: $759
Category Construction | Tags: bar,bathroom tiles,cheap,edges,inside | Comments Off on Day 13 – Inside edges
October 11, 2011 by Felix
When you’ve got the right tools, it makes things so much easier! The 3-way clamps really made things easier by holding on to those edges which were quite heavy!
Thanks to this photo I found, I was cut the edges for the angled corners precisely at 22.5° so they’d meet perfectly at the 135° corners.
Category Construction | Tags: 135 degrees,22.5 degrees,angles,bar,cut,edges,tiles | Comments Off on Day 12 – Done with outside edges
October 10, 2011 by Felix
Finally got the 14 one-foot black granite edges I needed! My challenge was how they were going to stay put as the mastic got hard enough to hold them in place. I had an idea of what I needed but wasn’t sure if it existed and sure enough…. the 3-way clamp! At $8 each, I did NOT want to buy 14 of them to get it all done at once so I just bought 3 and will just have to do 3 at a time. If I get up 1/2 hour earlier each day, I could then do 6 a day if it hardens enough in 12 hours.
Then, I grouted the walls with just plain white, non-sanded grout. Nothing to this really. Mix, spread, wait, wipe, wait, wipe, wipe, wipe.
Running total: $745
Category Construction | Tags: 3-way clamp,bar,edges,granite | 1 Comment
October 3, 2011 by Felix
There’s something about black that’s just… bar-like. As you saw yesterday, I started to paint the underneath of the bar black and today I (almost) finished painting the back, inside all black. I think it looks great and takes away the focus from everywhere except the parts that I want people to notice. Namely, the top and walls.
Running total: $602
Category Construction | Tags: back,bar,black,inside | Comments Off on Day 10 – A tribute to Johnnie
October 1, 2011 by Felix
Today I finished the tiling on the long side plus the edge at the end. Had to get another bucket of mastic for this and now have plenty left over.
When I went to Home Depot today, I found the edges I’m going to use which was cool but darn expensive! $6.95 isn’t much… until you need 14 of them! Still, all in all, there’s no less expensive way to have a bar built.
Watch a video of the Goodyear blimp checking up on my progress!
Running total: $570
Category Construction | Tags: bar,wall | 1 Comment
September 28, 2011 by Felix
This was easier than I thought. Spread, stick, repeat. Just had to cut the ones closest to the wall. Piece of cake!

Running total: $535
Category Construction | Tags: bar,mastic,tiles,tiling,wall | Comments Off on Day 8 – Stuck tiles to the short side. No biggie
September 24, 2011 by Felix
You’ll see in the pics how I had to first lay everything out, cut what I needed to, place the whole puzzle on the floor, spread mastic, and put it all back together.
I quickly learned how difficult it is when the surface you’re tiling is not perfectly flat! Add to that, the fact the accent tiles were about half as thick as the black granite and it left me with finding creative ways to figure it all out. I used extra mastic, washers, cement board, and whatever it took to get the accents as flush as possible.
Running total: $485
Category Construction | Tags: bar,flat,level,mastic,surface,tiles,tiling | Comments Off on Day 7 – A Perfectly Level Surface Would’ve Been Nice
September 18, 2011 by Felix
I knew, going into this, that deciding to go “diamond” with the bartop was going to mean extra cutting. Then, I decide to add the blue accents using the left over pool tiles and that really added to the corner cutting.
Running Total: $455
Category Construction | Tags: accents,bar,corners,cutting,granite,tiles | Comments Off on Day 6 – “Cutting Corners”
September 17, 2011 by Felix
After a bit of a vacation from this project, I decided to finally get to the tiling (something else I’ve never done before)! I went to Home Depot and bought 1/4″ HardieBacker board, cut it, and screwed it to the top which was just the thick plywood.
A shout-out to Alex Lopez for lending me his angle grinder and wet saw… you saved me time and money! ¡Muchas gracias amigo!
Running Total: $335
Category Construction | Tags: bar,tiles,tools,wet saw | Comments Off on Day 5 – Prep the top
July 25, 2011 by Felix
Of course, all bars need a top. Where all the magic happens. Well, at least where the elixirs that make the magic happen are consumed!
3/4″ pressure treated plywood will do it. 8 feet for the long side, 17″ wide which gives me a 9″ clearance underneath for stools, knees, & such. Short end will be a bit deeper because sink will go under there! (oooh… foreshadowing!)
Running total: $315 (Brew not included)
Category Construction | Tags: bar,plywood,top | Comments Off on Day 4 – No Longer Topless!
July 23, 2011 by Felix
Frame done, time to put up the walls. Duroc? I actually went with 1/2″ HardieBacker board. Regular coated deck wood screws did great for this.
My frame wasn’t 100% perfect as far as alignment goes, so I was concerned about the board cracking when screwing certain parts of the board that might have made the board bend too much. Well, I guess I was better than I thought (or maybe it was the Hardie board) because there was no breakage, although there was “bendage.”
At some huge gaps, I used shims or even some more HardieBoard. I just want to have a nice, straight surface area because at this point, I’m thinking tile will be lining these walls.
Running total: $270
Category Construction | Tags: bar,hardiebacker board,walls | Comments Off on Day 3 – Build dem Walls!
July 17, 2011 by Felix
On day 1, I built the frame… or so I thought!
What’s the most important part of any structure??? That’s right, the foundation! I want a 400 pound drunkard to be able to stumble straight into my bar and have it not move any more than the wall of my house! How do I accomplish that? Reinforce WAY more than necessary! Is there really “too much” when it comes to this stage? My opinion is NO!
So a ton of this bar’s strength is going to come from it being anchored to the wall. When the wall is made of gunite (see yesterday’s post), it is a real b%&ch to drill through it. But, as with everything else, when you’ve got the right tools, you’ve got the right tools. In this case, it was a 3/4″ masonry drill bit that chewed through the gunite like I didn’t think was possible after attempting it with all the wrong drill bits.
After anchoring it to the wall, I wanted more stability. I basically didn’t want it to wobble at all! Even if there were no other anchors in place. As you can tell from the pictures, I went nuts on placing extra pieces of 2x4s, metal braces, and screws to strengthen this bar. Something else I learned was the POWER of a reinforcement that takes advantage of a 45 degree angle! Add some 1/4″ Tapcons into the concrete underneath and now we’re talking STRENGTH!!
Running total: $200
Category Construction | Tags: bar,foundation,Frame,structure | Comments Off on Day 2 – A day of reinforcements
July 15, 2011 by Felix
With no carpentry skills whatsoever and no actual plan,
what I did have was a desire to build my own bar
on our patio by the pool!
Spent $126 at Home Depot on twelve 2X4s, outdoor deck screws, metal joiners, Tapcon screws, and a Tapcon drill bit. I then got to work for the next 4 hours.
Something I learned about was gunite, which is apparently what my outside walls are made of. This matters because when I thought I’d simply Tapcon screw the side up against the wall, the wall started to crumble around the drill bit and then the screw. Went back to Home Depot and came across Gary, probably the most knowledgeable guy about homes I’ve come across, and toggle bolts is what I’ll try next!
Category Construction | Tags: bar,Home Depot,screws,tapcon | 1 Comment
Copyright © 2025 Jacomino bar project is proudly powered by WordPress.org